Mechanical counter tutorial - 2021 - Unity
A downloadable game
ENGLISH VERSION (french version below)
We will see how to create an animated mechanical counter on Unity 3D.
In this example, it is a depth gauge, which calculates the depth of a submarine moving underwater.
How does it works?!Depending on the depth of the descent of our submarine, we will make the images corresponding to a numerical value visible on the screen. When we go beyond the 9, we have to move the image of the tens. And when the tens and units reach 9 together, we move the hundreds. But the animation of the images requires adjustments in order to keep a perfect fluidity. The duplicated digit 0 allows the animation from 9 to 0 and then from 0 to 1 without jerking. We could just as well have started at 5 and continued on the numbers 6, 7, 8, 9, 0, 1, ..., 5, 6, which would have been the same. But for the sake of logical calculations, we start at 0. This animation system allows for fluid and perpetual animation. |   |
An Image GameObjectI created the figures with the UI -> Text component, but there were problems with shifting depending on the resolution used. The image is therefore integrated into a UI GameObject -> Image. |  |
|
Calibrate each GameObject Image to the bottom right (or however you like, depending on how you create your mechanical counter). The structure in the hierarchy is as follows: | 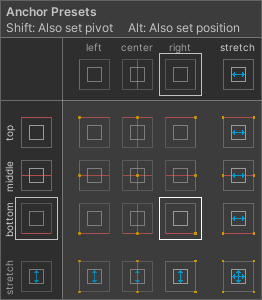  |
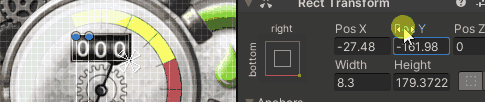
The C# codeFirst of all, we need to calculate precisely the step between each digit on the image in order to make the depth level visible graphically.
We will therefore store the position of each number in an array.
private float[] _step = new float[11];
private void Start() {
  for (ushort i = 0; i < 10; i++) {
  {
    // pas = pos Y + (delta * i / 10)
    _step[i] = -161.98f + (163.38f * i / 10);
  }
}
Then, in the FixedUpdate method, we will add the engine code of the mechanical counter:
void FixedUpdate()
{
    // If you are underwater, the counter starts its animation
    if (GameManager.isUnderwater)
    {
        // The modulo will return the remainder of division
        // by 10, so a digit between 0 and 9
        _unitsFloat = playerDepth % 10;
        _units = (int)_unitsFloat;
        // The tens are divided by 10 thanks to the multiplication
        // by 0.1
        // Division takes 4 times more CPU cycles than
        // multiplication!
        _tensFloat = playerDepth * 0.1f % 10;
        _tens = playerDepth >= 10 ? (int)_tensFloat : 0;
        _hundredsFloat = playerDepth * 0.01f % 100;
        _hundreds = playerDepth >= 100 ? (int)_hundredsFloat : 0;
        // Lerp allows to perform a linear interpolation,
        // see the Unity documentation ;-)
        _unitsConvert = Mathf.Lerp(_step[0], _step[_step.Length -1], _unitsFloat * 0.1f);
        if (_units == 9)
        {
            // Moving the tens
            _tensConvert = Mathf.Lerp(_step[_tens], _step[_tens + 1], _unitsFloat - 9);
            if (_tens == 9)
            {
                // Moving the hundreds
                _hundredsConvert = Mathf.Lerp(_step[_hundreds], _step[_hundreds + 1], _unitsFloat - 9);
            }
        }
        else
        {
            // Counter animation on all counter readings
            _tensConvert = Mathf.Lerp(_step[0], _step[_step.Length -1], _tens * 0.1f);
            _hundredsConvert = Mathf.Lerp(_step[0], _step[_step.Length -1], _hundreds * 0.1f);
        }
        // Apply the new Y position to the IU image at each
        // counter: units, tens, hundreds.
        _ImageUnitsPos.anchoredPosition = new Vector3(-2.39f, _unitsConvert, 0f);
        _ImageTensPos.anchoredPosition = new Vector3(-15.34f, _tensConvert, 0f);
        _ImageHundredsPos.anchoredPosition = new Vector3(-27.48f, _hundredsConvert, 0f);
    }
}
| |
Integrate the C# code to the Counter GameObject, and drag&drop the units, tens and hundreds GameObjects so that the script has the references.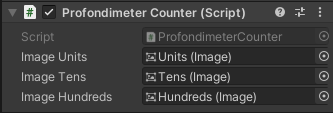 Don't forget to check the Rect Mask 2D component at the Counter GameObject so that the numbers are hidden and that we only see the values we are interested in! 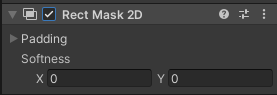 To concludeOf course, you can always do a more optimised and cleaner C# code, and not bother with floating values writing in the source code. It is better to calculate the graphical values via a script rather than by hand.The purpose of this tutorial is to explain the logic behind the operation of an old-fashioned mechanical meter. I hope you enjoyed it! Come and see its integration in my game STEAMPUNK GRAVITY on Tweeter.
| |

VERSION FRANCAISE
Compteur mécanique à l'ancienne en C# sur Unity
Nous allons voir comment créer un compteur mécanique animé sur Unity 3D.
Dans cet exemple, il s'agit d'un profondimètre, qui calcule donc la profondeur d'un engin sous-marin se déplaçant sous l'eau.
La logique de fonctionnementEn fonction de la descente en profondeur dans l'eau par notre engin, on va faire interagir les images correspondantes à une valeur chiffrée et visible à l'écran. Quand on dépasse l'unité 9, il faut déplacer l'image des dizaines. Et quand les dizaines et unités arrivent à 9 ensemble, on déplace les centaines. Mais l'animation des images nécessite des réglages afin de garder une fluidité parfaite. Le chiffre 0 dupliqué permet d'avoir l'animation du 9 jusqu'au 0 puis du 0 au 1 sans saccade. On aurait pu tout aussi bien commencer à 5 puis continuer sur les chiffres 6, 7, 8, 9, 0, 1, ..., 5, 6, ce qui aurait été pareil. Mais dans un soucis de logique de calculs, on commence à 0. Ce système d'animation permet d'avoir une animation fluide et perpétuelle. | |
Un GameObject ImageJ'ai créé les chiffres avec le composant UI -> Text mais il y avait des problèmes de décalage selon la résolution utilisée. L'image est donc intégrée dans un GameObject UI -> Image. | |
|
Calibrer chaque GameObject Image en bas à droite (ou comme vous voulez, cela dépendra de la manière dont vous créez votre compteur mécanique). La structure dans la hiérarchie est ainsi : | |
Le code C#Il faut dans un premier temps calculer précisément le pas entre chaque chiffre sur l'image afin de rendre le niveau de profondeur visible graphiquement.
On va donc stocker la position de chaque chiffre dans un tableau.
private float[] _step = new float[11];
private void Start() {
  for (ushort i = 0; i < 10; i++) {
  {
    // pas = pos Y + (delta * i / 10)
    _step[i] = -161.98f + (163.38f * i / 10);
  }
}
Ensuite, dans la méthode FixedUpdate, on va ajouter le code moteur du compteur mécanique :
void FixedUpdate()
{
    // Si on est sous l'eau, le compteur démarre son animation
    if (GameManager.isUnderwater)
    {
        // Le modulo retournera le restant de division par 10,
        // soit un chiffre en 0 et 9
        _unitsFloat = playerDepth % 10;
        _units = (int)_unitsFloat;
        // Les dizaines sont divisées par 10 grâce à la
        // multiplication par 0.1
        // La division prends 4 fois plus de cycles CPU que
        // la multiplication !
        _tensFloat = playerDepth * 0.1f % 10;
        _tens = playerDepth >= 10 ? (int)_tensFloat : 0;
        _hundredsFloat = playerDepth * 0.01f % 100;
        _hundreds = playerDepth >= 100 ? (int)_hundredsFloat : 0;
        // Lerp permet d'effectuer une interpolation linéaire,
        // voir la doc de Unity ;-)
        _unitsConvert = Mathf.Lerp(_step[0], _step[_step.Length -1], _unitsFloat * 0.1f);
        if (_units == 9)
        {
            // On bouge les dizaines
            _tensConvert = Mathf.Lerp(_step[_tens], _step[_tens + 1], _unitsFloat - 9);
            if (_tens == 9)
            {
                // On bouge les centaines
                _hundredsConvert = Mathf.Lerp(_step[_hundreds], _step[_hundreds + 1], _unitsFloat - 9);
            }
        }
        else
        {
            // animation du compteur sur l'ensemble des valeurs
            // du compteur
            _tensConvert = Mathf.Lerp(_step[0], _step[_step.Length -1], _tens * 0.1f);
            _hundredsConvert = Mathf.Lerp(_step[0], _step[_step.Length -1], _hundreds * 0.1f);
        }
        // Applique la nouvelle position Y à l'image de l'UI
        // à chaque compteur : unités, dizaines, centaines.
        _ImageUnitsPos.anchoredPosition = new Vector3(-2.39f, _unitsConvert, 0f);
        _ImageTensPos.anchoredPosition = new Vector3(-15.34f, _tensConvert, 0f);
        _ImageHundredsPos.anchoredPosition = new Vector3(-27.48f, _hundredsConvert, 0f);
    }
}
| |
| Intégrer le code C# au GameObject Counter, et faire un drag&drop des GameObjects des unités, dizaines et centaines afin que le script ait les références. Ne pas oublier de cocher le Rect Mask 2D au GameObject Counter afin que les chiffres soient cachés et que l'on ne voit que les valeurs qui nous intéressent ! Pour conclureEvidemment, on peut toujours faire un code C# plus optimisé et plus propre, et ne pas s'embêter avec des chiffres en durs. Il est préférable de calculer les valeurs graphiques via un script plutôt qu'à la main.Ce tutoriel a pour but de dégrossir la logique de fonctionnement d'un compteur mécanique à l'ancienne. J'espère que ça vous a plu ! Venez voir son intégration dans mon jeu STEAMPUNK GRAVITY, visible sur Tweeter.
| |

Leave a comment
Log in with itch.io to leave a comment.